
Looking for a way to shrink an LXC disk size in Proxmox? Proxmox VE makes it easy to grow an LXC container disk with a single pct resize command. Shrinking an LXC disk, however, is a different story. Since LVM thin volumes do not support direct downsizing, the safest approach to reduce disk size is to use a backup-and-restore workflow with Proxmox Backup Server (PBS).
This comprehensive guide walks through the cleanest and safest method to shrink an LXC disk in Proxmox, complete with real-world troubleshooting cases encountered in a homelab environment.
Why Can’t You Shrink an LXC Disk Directly in Proxmox? #
pct resize only supports increasing disk size. LVM thin provisioning is inherently one-directional in this regard: growing a logical volume is trivial, but shrinking it requires complex, risky filesystem operations. The solution is to back up the container to PBS (Proxmox Backup Server), modify the disk size in the container config, then restore with the new size applied.
Prerequisites for Shrinking an LXC Disk #
- Root access to the Proxmox host via SSH
- PBS configured, or local storage with sufficient free space
- Actual data inside the container must be smaller than the target disk size
Steps to Shrink an LXC Container Disk #
1. Check Actual Disk Usage #
Before anything else, confirm the container’s used space does not exceed the new target size.
pct exec {ID} -- df -h /Example output for LXC 101, being shrunk from 16G to 5G:
Filesystem                        Size  Used Avail Use%
/dev/mapper/pve-vm--101--disk--0   16G  3.2G   12G  21%
Only 3.2G used — safe to shrink to 5G.
2. First Backup to PBS #
vzdump {ID} --storage pbs --compress zstd --mode snapshotNote the backup path from the log output, it looks like:
INFO: creating Proxmox Backup Server archive 'ct/101/2026-05-08T01:07:13Z'3. Edit the Container Config #
nano /etc/pve/lxc/{ID}.confFind the rootfs line and change the size= parameter to the new target:
# Before
rootfs: local-lvm:vm-101-disk-0,size=16G

# After
rootfs: local-lvm:vm-101-disk-0,size=5G
Save the file (Ctrl+O, Enter, Ctrl+X).
4. Second Backup #
Back up again after editing the config. This second backup is the one that will be restored. Since only the config changed, this backup is very fast — usually under 30 seconds because PBS uses incremental deduplication.
vzdump {ID} --storage pbs --compress zstd --mode snapshotNote the timestamp of this second backup.
5. Stop and Restore #
pct stop {ID}

pct restore {ID} pbs:backup/ct/{ID}/{TIMESTAMP} \
  --storage local-lvm \
  --rootfs local-lvm:{NEW_SIZE} \
  --force 1 \
  --unprivileged 1
Real example for LXC 101:
pct stop 101

pct restore 101 pbs:backup/ct/101/2026-05-08T01:11:11Z \
  --storage local-lvm \
  --rootfs local-lvm:5 \
  --force 1 \
  --unprivileged 1
The --force 1 flag is required because a container with the same ID already exists. The --unprivileged 1 flag must match the original container setting (check with grep unprivileged /etc/pve/lxc/{ID}.conf).
6. Verify #
pct start {ID}
pct exec {ID} -- df -h /
Troubleshooting #
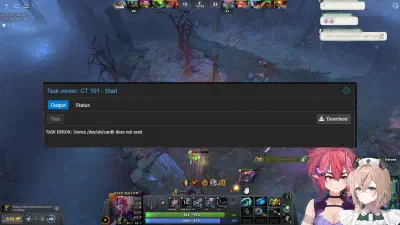
Error: CT already exists on node #
CT 101 already exists on node 'pve'Add --force 1 to the restore command.
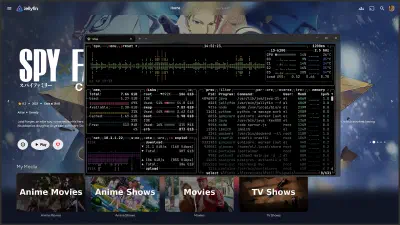
Jellyfin Refuses to Start After Shrink #
This was a real case encountered after shrinking a Jellyfin LXC to 5G. Jellyfin crashed immediately with:
System.InvalidOperationException: The path `/var/lib/jellyfin/data` has insufficient
free space. Available: 1.4GiB, Required: 2GiB.
Root cause: Recent versions of Jellyfin enforce a hard minimum of 2GB free space before starting. With a 5G disk and 3.2G used, only 1.4G remained — below the threshold.
Solution A (Recommended): Expand the container disk slightly:
pct stop {ID}
pct resize {ID} rootfs +2G
pct start {ID}
Solution B: Free up space inside the container first:
systemctl stop jellyfin
rm -rf /var/cache/jellyfin/*
rm -rf /var/lib/jellyfin/transcodes/*
apt clean
journalctl --vacuum-size=50M
df -h /
systemctl start jellyfin
Lesson learned: Always leave a comfortable buffer — at least 2-3GB above actual data usage. Do not size the disk too close to the minimum.
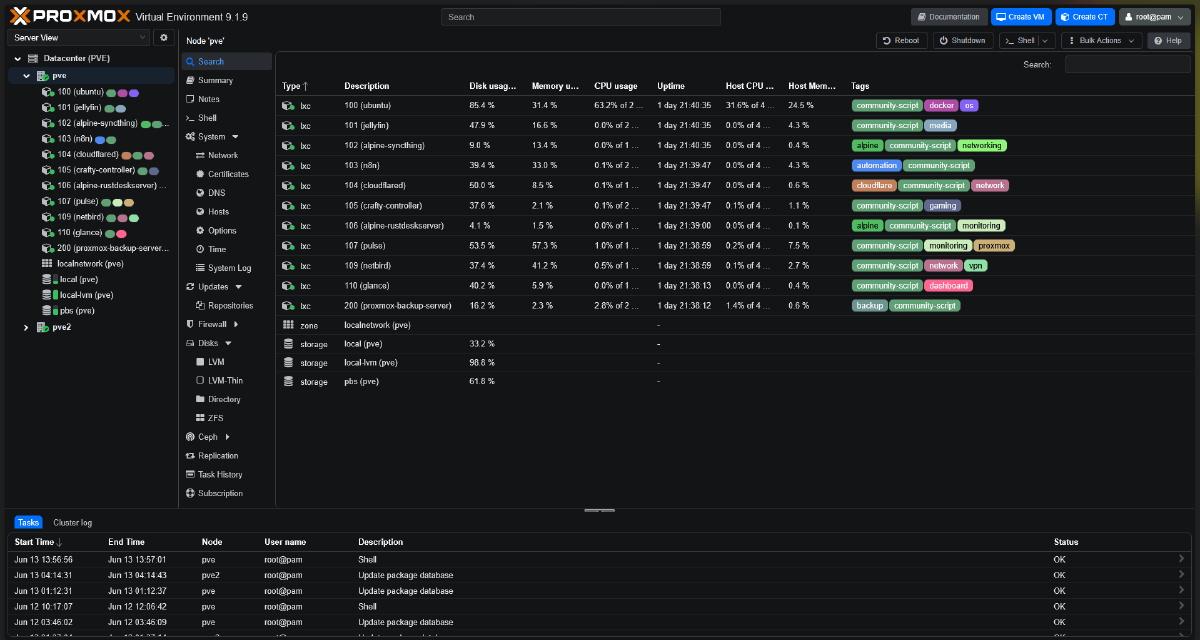
Crafty Controller Fails with session.lock Error #
After restore, Crafty Controller failed to start with:
Failed to locate existing session.lock with error: Expecting value: line 1 column 1 (char 0)The session.lock file became empty or corrupt because the container was force-stopped during the restore process.
Fix: Delete the session.lock files — Crafty regenerates them automatically on startup:
find /opt/crafty-controller -name "session.lock"
rm /opt/crafty-controller/crafty/crafty-4/app/config/session.lock
rm /opt/crafty-controller/crafty/crafty-4/servers/{UUID}/world/session.lock

systemctl start crafty-controller
Finding the Backup Path in PBS #
If you missed noting the timestamp from the log output:
pvesh get /nodes/$(hostname)/storage/pbs/content | grep -E "ct/101"Alternatively, use the Proxmox web UI: Storage > pbs > Backups, select the container, and note the backup ID.
Additional Tips #
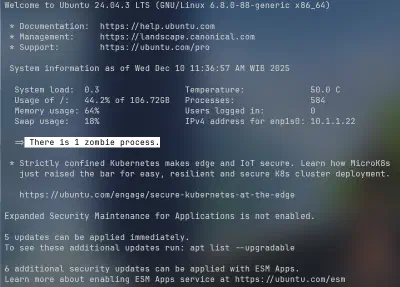
Monitor your thin pool regularly:
lvs pve/dataWatch the Data% column. If it approaches 85%, clean up unused data or expand the pool before it runs out completely.
Enable thin pool auto-extend to prevent sudden out-of-space situations. Edit /etc/lvm/lvm.conf:
thin_pool_autoextend_threshold = 80
thin_pool_autoextend_percent = 20
Do not shrink too aggressively. Always leave a 30-40% buffer above actual data size. If data is 3.2G, do not set the disk to 4G — set it to at least 6-7G to leave room for logs, updates, and normal application growth.
Quick Command Reference #
# 1. Check actual disk usage
pct exec {ID} -- df -h /

# 2. First backup to PBS
vzdump {ID} --storage pbs --compress zstd --mode snapshot

# 3. Edit config (change size=)
nano /etc/pve/lxc/{ID}.conf

# 4. Second backup (with updated config)
vzdump {ID} --storage pbs --compress zstd --mode snapshot

# 5. Restore with new size
pct stop {ID}
pct restore {ID} pbs:backup/ct/{ID}/{TIMESTAMP} \
  --storage local-lvm \
  --rootfs local-lvm:{SIZE} \
  --force 1 \
  --unprivileged 1

# 6. Verify
pct start {ID}
pct exec {ID} -- df -h /