Having a blog based on a Static Site Generator (SSG) like Hugo provides an incredible speed advantage. However, that performance often drops drastically once we start installing Google Adsense ads. External scripts from Adsense are usually quite large and heavy, burdening the initial rendering process of a web page.
The main issue is that the Adsense script loads as soon as the browser opens the website, often before the main content has finished displaying. This causes Largest Contentful Paint (LCP) and Total Blocking Time (TBT) scores on Google PageSpeed Insights to turn red, which is detrimental to both SEO and user experience.
The good news is that you can overcome this problem by implementing a lazy loading adsense in hugo technique. With this method, the ad script will only load when a visitor interacts with the page (such as scrolling or clicking) or after a specific time duration. Let’s look at the technical guide below.
Preparation Before Starting #
Before moving to the execution phase, make sure you have prepared the following:
- Access to your Hugo project directory.
- Your favorite text editor (VS Code, Sublime Text, or Vim).
- The ad unit script from your Google Adsense account.
- A basic understanding of the Hugo folder structure, especially the
layouts/partialsfolder.
Step-by-Step Implementation of Lazy Loading Adsense in Hugo #
Follow this sequence to optimize ad loading without sacrificing site speed.
1. Create the Script Delayer Partial #
The first step is to create a “trigger” file responsible for delaying the loading of external scripts. Create a new file in the folder layouts/partials/script-delayer.html and insert the following code:
<script>
const autoLoadDuration = 5; // Duration in seconds
const eventList = ["keydown", "mousemove", "wheel", "touchmove", "touchstart", "touchend"];
const autoLoadTimeout = setTimeout(runScripts, autoLoadDuration * 1000);

eventList.forEach(function(event) {
    window.addEventListener(event, triggerScripts, { passive: true })
});

function triggerScripts() {
    runScripts();
    clearTimeout(autoLoadTimeout);
    eventList.forEach(function(event) {
         window.removeEventListener(event, triggerScripts, { passive: true });
    });
}

function runScripts() {
    document.querySelectorAll("script[data-delay]").forEach(function(scriptTag) {
        const delaySrc = scriptTag.getAttribute("data-delay");
        if (delaySrc) {
            scriptTag.setAttribute("src", delaySrc);
            scriptTag.removeAttribute("data-delay");
            if (scriptTag.hasAttribute("async")) {
                scriptTag.setAttribute("async", "");
            } else if (scriptTag.hasAttribute("defer")) {
                scriptTag.setAttribute("defer", "");
            } else {
                scriptTag.setAttribute("defer", "");
            }
        }
    });
}
</script>
Technical Explanation: This script works by monitoring user activity (eventList). If a user interacts with the page, such as scrolling or touching the screen, the runScripts function is triggered. If the user does nothing, the script will still load automatically after 5 seconds (autoLoadDuration) to maintain SEO performance.
2. Call the Partial in the Main Template #
To make this script delayer active across all pages, you need to call it in your base layout file. This is usually located at layouts/_default/baseof.html.
Place the calling code right before the closing </body> tag:
    {{ partial "script-delayer.html" . }}
</body>
Technical Explanation: Placing it at the end of the body ensures that this interaction-monitoring script does not block the rendering of your blog’s main visual elements (DOM).
3. Modify the Adsense Ad Unit Script #
Now, it’s time to change the way you install your ads. Normally, the default Adsense script uses the src attribute. We will change this to data-delay so it isn’t immediately executed by the browser.
Modify your ad unit to look like this:
<script async data-delay="https://pagead2.googlesyndication.com/pagead/js/adsbygoogle.js?client=ca-pub-xxxxxxxxxxxxxxxx"
     crossorigin="anonymous"></script>

<ins class="adsbygoogle"
     style="display:block"
     data-ad-format="autorelaxed"
     data-ad-client="ca-pub-xxxxxxxxxxx"
     data-ad-slot="xxxxxxxx"></ins>

<script>
     (adsbygoogle = window.adsbygoogle || []).push({});
</script>
Technical Explanation: By replacing src with data-delay, the browser treats the tag as an inactive script during the initial page load. Once a user interaction is detected, the script delayer we created in the first step will move the value from data-delay back to src, causing the ad to load at that moment.
Why Use This Method? #
Implementing lazy loading adsense in hugo is crucial for blogs chasing high performance. Google Adsense is known to be “resource-hungry” because it performs many DNS requests and complex JavaScript executions. Without a delay, the browser will be busy downloading ads while your text content hasn’t even appeared perfectly to the reader.
From a technical standpoint, using the data-delay attribute is much safer than extremely manipulating the Adsense script, which risks violating Google’s Terms of Service (ToS). We are not changing how the ad script functions; we are simply managing when that script is allowed to start working.
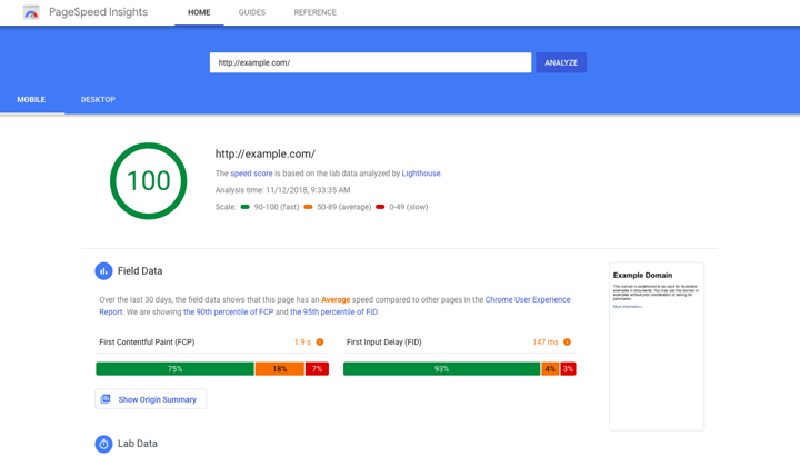
Furthermore, this method is highly adaptive to the Core Web Vitals algorithm. By giving full priority to the main visual elements in the first few seconds, you can achieve a much higher performance score (even reaching 90-100) on PageSpeed Insights, even if the blog is full of ads.
Conclusion and Additional Tips #
Implementing lazy loading adsense in hugo is a smart move to maintain the balance between monetization and website performance. By separating the ad script loading process from the main rendering process, your blog stays lightweight for visitors while still generating revenue.
Troubleshooting Tips:
- Ads Not Appearing: Make sure you have replaced
ca-pub-xxxxxxxxwith your actual ID and check the browser console (F12) for any JavaScript errors. - Messy Layout: Use a
<div>wrapper with a fixed height on the ad unit to avoid Layout Shift (CLS) when the ad appears. - Wait Time: You can set the
autoLoadDurationto a higher number if you want to maximize the PageSpeed score, but 5 seconds is generally a safe middle ground.