
Recently, I needed a demo server to test an application locally. Since I didn’t have a spare physical server, I decided to use WSL2 (Windows Subsystem for Linux) on my primary PC as a resource-efficient alternative.
However, a challenge arose when I tried to access services inside WSL from other devices on the same network. By default, WSL is isolated from the local network because it uses an internal network configuration. This prevents other devices on the LAN from “seeing” or accessing the WSL IP address.
In this article, I will provide a step-by-step solution to expose WSL to LAN. We will change the virtual switch configuration to External and set a static IP so your services can be permanently accessed by other devices on the same network.
Preparation and Prerequisites #
Before starting, ensure you meet these requirements to keep the configuration process smooth:
- Windows 10/11 Pro or Enterprise: Required to access the Hyper-V Manager features.
- WSL2 installed and running on your system.
- Administrator Access: Needed to modify Windows network settings.
- Network Connection: Ensure your PC is connected to the router via Ethernet or Wi-Fi.
Step-by-Step: Exposing WSL to LAN #
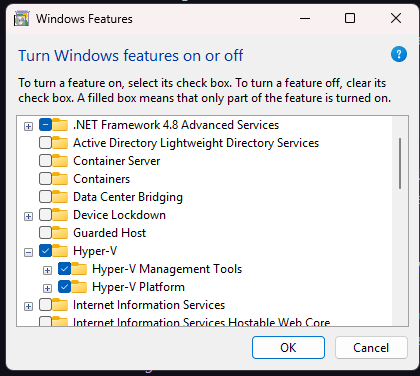
1. Enable Full Hyper-V Features #
By default, WSL2 only uses a basic virtual machine platform. To manage virtual switches deeply, you must enable the full Hyper-V feature set.
- Press Win + R, type
optionalfeatures, and press Enter. - Find Hyper-V in the list, check all boxes, and click OK.
- Restart your computer if prompted.
2. Change WSL Virtual Switch to External #
This step is the key to exposing WSL to LAN. We will change the connection type from internal (host-to-WSL only) to external (bridged directly to the physical adapter).
- Open Hyper-V Manager with Administrator privileges.
- Select your PC name in the left panel, then click Virtual Switch Manager on the right side.
- Look for the switch named “WSL”.
- Change the Connection type from Internal network to External network.
- Select the active network adapter (Ethernet or Wi-Fi) currently connected to your LAN.
- Click Apply and confirm the warning dialog.
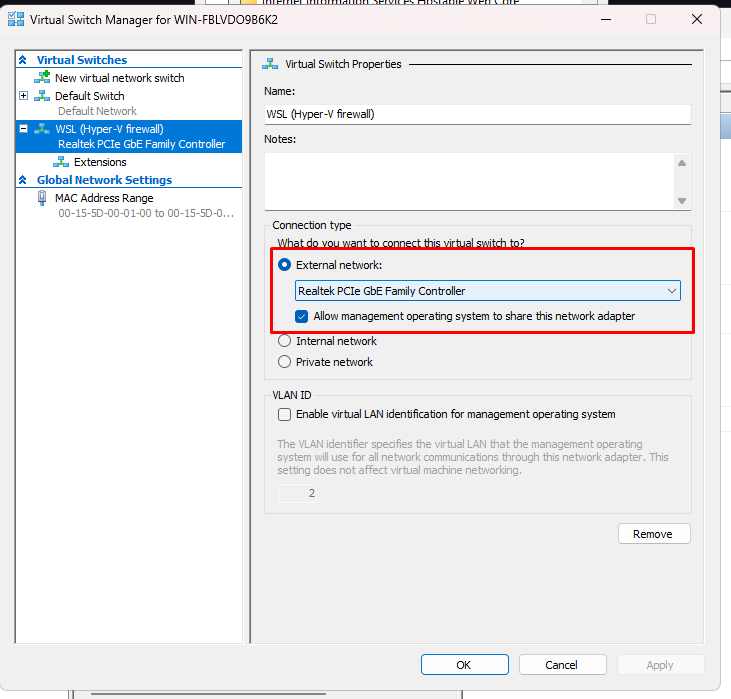
Setting the type to External allows WSL to act as if it is directly connected to your physical router via a bridge. This enables it to receive an IP address within the same subnet as other devices in your home or office.
3. Verify the New IP Address on Host #
Once the changes are applied, Windows will assign a new IP to the WSL virtual adapter that matches your LAN subnet.
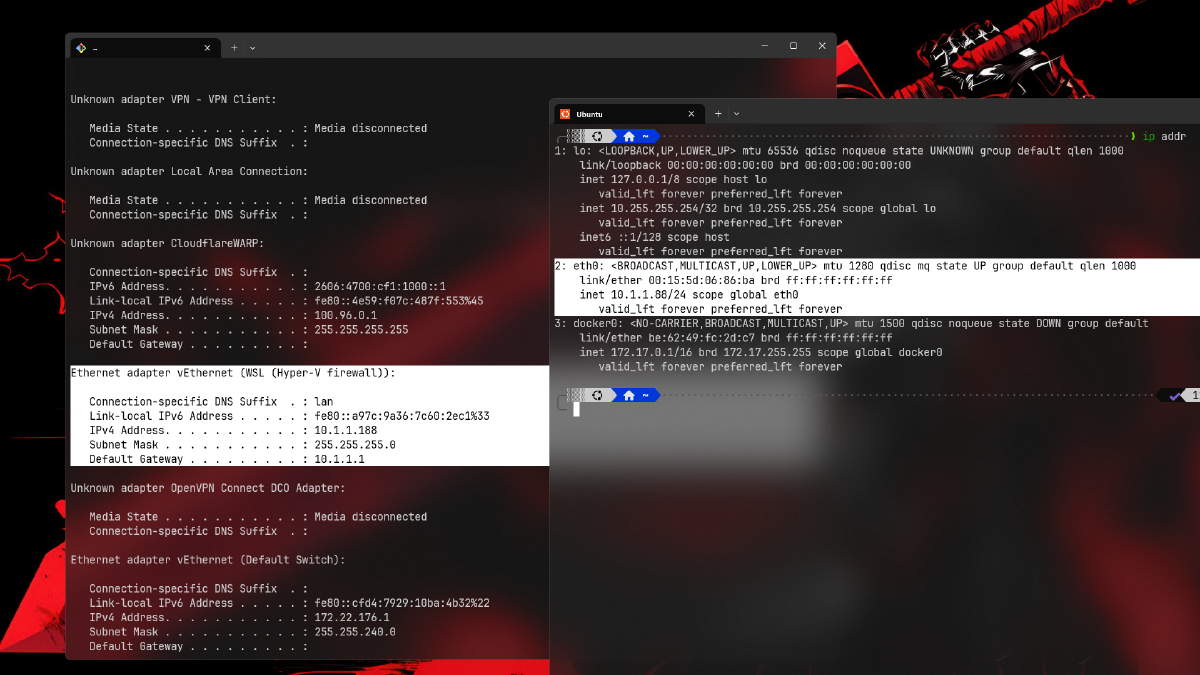
Open Command Prompt and run:
ipconfig
Look for the Ethernet adapter vEthernet (WSL) section. If you see an IP address like 192.168.x.x (matching your router’s subnet; mine is 10.1.1.188), it means WSL has successfully bridged to the LAN.
4. Static IP Configuration and Systemd Automation #
The next issue is that the WSL IP often changes or resets upon restart. To fix this, we will create a systemd service to apply a static IP automatically during WSL boot.
Ensure systemd is active
Check status:
ps -p 1 -o comm=If the output is:
systemdyou are ready.
If not, enable it:
sudo nano /etc/wsl.confAdd these lines:
[boot]
systemd=true
Then restart WSL:
wsl --shutdownOnce systemd is active, open your WSL terminal and create a new service file:
sudo nano /etc/systemd/system/wsl-static-ip.servicePaste the following code (adjust the IP 10.1.1.88 and gateway 10.1.1.1 to match your router’s range, which you verified using ipconfig earlier):
[Unit]
Description=Set static IP for WSL
After=network.target

[Service]
Type=oneshot
ExecStart=/usr/sbin/ip addr flush dev eth0
ExecStart=/usr/sbin/ip addr add 10.1.1.88/24 dev eth0
ExecStart=/usr/sbin/ip route add default via 10.1.1.1
ExecStart=/usr/sbin/ip link set eth0 up
ExecStart=/bin/sh -c 'printf "nameserver 8.8.8.8\nnameserver 1.1.1.1\n" > /etc/resolv.conf'
RemainAfterExit=yes

[Install]
WantedBy=multi-user.target
The ip addr flush command clears old configurations to prevent conflicts, while writing to /etc/resolv.conf ensures internet connectivity (DNS) remains functional after the IP change.
Enable the service with these commands:
sudo systemctl enable wsl-static-ip.service
sudo systemctl start wsl-static-ip.service
5. Check Service Status #
To verify the automation is working, check the service status:
systemctl status wsl-static-ip.serviceIf you see active (exited) in green, the service ran successfully, and your static IP is configured.
Network Connection Flow #
Here is how data flows after the configuration:
graph LR
    A[Perangkat LAN Lain] -- Request --> B(Router)
    B -- Forward --> C{Virtual Switch External}
    C -- Direct Access --> D[WSL2 Instance]
    D -- Respond --> A
Additional Technical Explanation #
Why Use the External Switch Method? #
This method provides the highest flexibility compared to standard port forwarding. By using an External Switch, WSL receives a unique identity on the network, similar to a separate physical computer. This is useful if you run multiple services (web server, database, MQTT broker) that need to be accessed without mapping ports individually in the Windows firewall.
Efficiency-wise, this minimizes the NAT (Network Address Translation) layers typically applied by WSL. This reduces data communication overhead, which is crucial for low-latency or high-throughput application demos.
Security Implications and Network Context #
Opening WSL access to the network has security implications. Since WSL is now “visible” to other devices on the LAN, ensure you configure a firewall inside your Linux distro (e.g., using ufw). Do not leave sensitive ports open without strong authentication.
Also, remember that if you change networks (e.g., from office Wi-Fi to home Wi-Fi), you may need to update the static IP configuration in the systemd service to match the new router’s subnet. Otherwise, WSL might lose internet access due to an invalid gateway.
Conclusion #
Exposing WSL to LAN is a smart solution for building a demo server environment without extra hardware. By changing the virtual switch to External and using a systemd service to maintain a static IP, your services can now be accessed stably by other devices on the local network.
Common Troubleshooting:
- No Internet in WSL: Double-check the nameserver addresses in
/etc/resolv.confand ensure the default gateway matches your router’s IP. - Devices still cannot access: Ensure the Windows Firewall on the host allows inbound rules for the specific ports you are using.
If you have questions or encounter issues, feel free to ask in the comments below. Happy experimenting with your WSL server!